The image generation becomes so easy after the arrival of
Stability.ai. One of the great features you have ever heard of face swapping in stable
diffusion using Roop extension.
Yes! This can be easily achieved with just a few clicks using the Roop extension which you can use with stable diffusion with Automatic1111. The cool thing about this software is you don't need to accumulate or train huge datasets.
Here, we will help you how to do a face swap. For the tutorial, we are using Automatic 1111 with stable diffusion. But all the steps will be the same for other applications as well.
Installation process:
1. first of all, make sure you have already installed and set up Automatic 1111 and stable diffusion models.
2. Now, we have to install Visual Studio by going to their official link.
-Asp.net web development
-Azure development
-.NET desktop development
And check these options:
-Python dev.,
-Desktop dev. For C++ and
-Visual Studio extension development
If you have these extensions already on your machine then you don’t need to follow this step.
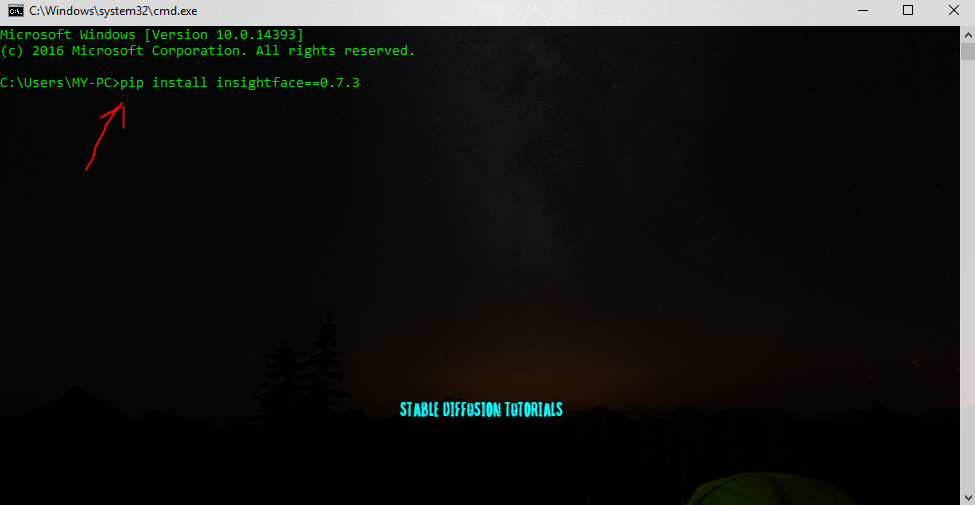
5. By pressing the window key + R and type cmd to open and Run this command on your command prompt :
pip install insightface==0.7.3
Using Roop extension with image generation:
Using Roop extension on image to image or on inpainting mode as well, but here we have used image to image to make you understand as simple as it is.
Swapping Face with single subject on image:
1. Now, just drag and drop the image you want to do with face swapping.
2. Click on the “img2img” tab presented over the left side of the Automatic 1111 dashboard.
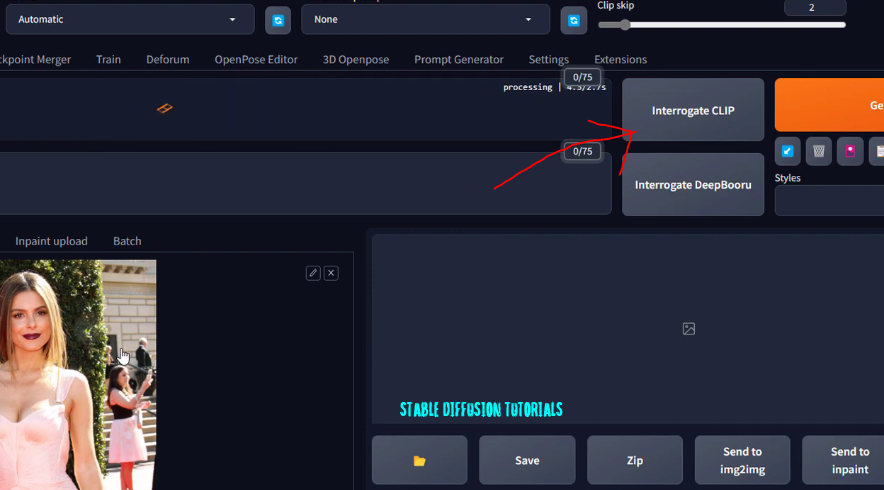
3. Now, press the "Interrogate Clip" button presented on the top of the dashboard beside the generate button.
4. Click on Roop Extension presented at the lower left corner of the Automatic 1111 dashboard.
Look at the result after swapping. The face of celebrity face has been replaced with Megan Fox's face.
Quite impressive! Right?
Sometimes when we generate images using Stable Diffusion it doesn’t generate clean faces. So, here we can use Roop extension face swapping as well.Now, if you have multiple faces in an image and you want to replace a targeted face then yes, you can do that as well.
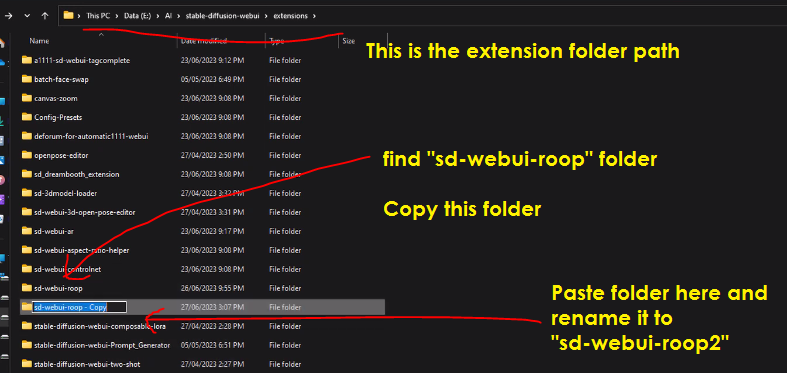
To do that first of all go to that installed folder of the Stable
Diffusion extensions folder.
Search for “sd-webui-roop”
folder in the Stable diffusion extension folder. Copy this folder and paste it to make a duplicate copy of it and rename it to something different as per
your requirements.
In our case, we renamed it to “sd-webui-roop2”.
Now just restart the Automatic 1111 to take effect.
Now you will see two Roop extensions on the extensions tab of Automatic 1111. You can use
it first for single-face swapping and another new one for multiple-face
swapping.
We have generated the above image. From the left to right direction, we count the subject's face.
So, here you can observe in the above image that the second woman’s eye is not looking good and
looks like a ghostly image. So, here we will use this multiple-face-swapping
technique to replace the second woman's face.
For the new face, we are using Megan Fox's image.
1. Now, just drag and drop the image into the Roop extension place and click on Enable.
2. Select the number (Starting from 0) of the face number you want to replace with.
3. Like in our case we want to select the first subject (first woman face). So into the comma-separated face number we have set the value to 0 and click on Generate.
And
this is the generated output. Now you can see how intelligently it has replaced
that first woman’s face with the new face. The refinement and detailing are
quite satisfactory.
1. Now,
let’s say we want to work on the second target subject. So into the
Comma separated face number section we have set the value to 1 and clicked on Generate.
The second face was also successfully swapped.
2. Again,
let’s say we want to work on both the subjects. So into the
Comma separated face number section we have set the value to 0,1 and clicked on Generate.
And here is the output of both subject's faces got swapped.
Unfortunately, due to some malpractices and uncensored issues, the Roop community has discontinued the support. We may see some good results if they try to work more on this model.
Conclusion:
The only problem with this extension is that sometimes it doesn’t work perfectly if you try to use a face that does not have the same face shape as the targeted one.
But,
in the above tutorial, we used different face shapes for swapping and the
generated output is not that bad which seems like the model trained very much well.


